1. Polish the base of the Router!
I used domestic spray furniture polish, and then buffed it dry with a cloth. I can't tell you how much of a difference this makes in controlling small movements of the router. I have since found that professionals use a spray on PTFE dry lubricant and I can see why. Not seen this tip anywhere else so maybe I am the only person who wasn't lubricating the base and everyone else already knows.
2. Never try for the BIG cut.
I _gradually_ worked my way to the line. I had made a template and used a combination of cutters with the bearing at the top and bottom to get the body shape cut. The template had two layers of tape added to the edge at this stage which for the final pass (full length 50mm cutter with end bearing to do the 41mm body) I removed. The removal of the tape meant that the final pass was quick, without grab and left virtually no burn marks.3. Keep EVERY off cut.
Practise for the large diameter bridge and tailpiece holes, finishing techniques, trial cutting, trial trim tools, you name it, keep all the offcuts you have.
I'll quickly run through the process that worked for me.
I managed to find some offcuts in a local timber supplier. A block of Sapele, a length of Black Walnut strip and a good chunk of Oak which had bounced on the planer and therefore had a defect area. All good low cost stuff. I cut and glued the wood to make a body-blank-sandwich. I made a Router-Planer from ideas on the Internet and trimmed it to 41mm
The first part was to draw a body shape. I used Paintshop to scale a PRS guitar body photo to real size using 150 pixels to an inch. I then used the distort tools to move the basic shape around and then used the curve draw tool to make new edges and lines. I could then print a portion of the overall design to A4 paper as full scale. By splitting the design into three sheets I could then print real-scale drawings taping together the sheets. I included some red thin construction lines to aid alignment of the drawings. By the 8th design, iteration F it bore no resemblance to the PRS original and I had a finished print which I glued down to 12mm thick MDF board. The MDF cuts well with a thin smooth cut Jig Saw blade and then I used a rasp (bottom of picture) and sandpaper to smooth the edges. Smooth lines here will pay dividends later and MDF is a lot softer than Oak.
The addition of drawn pickups and the neck cavity proved useful as well as the centre line being pre-printed. The final bridge will be a Les Paul type and not a Strat hardtail as in the original drawing.
The design was then transferred to the body blank and drawn on both sides. The blank had a centre line drawn on both sides. The distance from the base of the guitar from the edge ensured I was within a mm or so on both sides.
I then hand routed close to the edge with a 6mm dual cut router blade. This was SLOW work. You have to go in 5-6mm depth steps but eventually you will remove wood and also end up at the depth limit of the cutter.
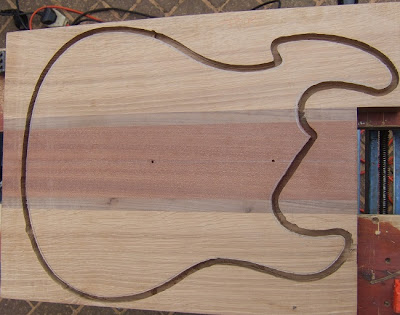
This is where accurately marking out on both sides with the template comes in. I then flipped the body over and began cutting again, though a bit further away from the line this time. As you can see below, I got daylight at last.
The template was then refitted and SCREWED to the top. This is where having the pickup marked acts as a sanity check when sticking a screw in. I started with a template cutter (bearing at the top) to cut an inch below the template. I then turned the body over and used a trim cutter (bearing at tip) to follow this cut and remove the rest of the material in a gentle manner. As you can see below all the initial iterative cutting has left burn marks. For the final cut I removed the white tape and went with a full length cut trim cutter.
I have seen people using double sided tape to secure the template but I was glad I opted to use screws. I ended up moving the neck screw as I couldn't find a countersunk head screw and it got in the way of the router.
After the final cut very nearly all the burn marks were removed and the body had a good clean line and more importantly cleanly cut with no tear-out. Overall very pleased with progress so far.I'll update with more pictures as this progresses.


No comments:
Post a Comment